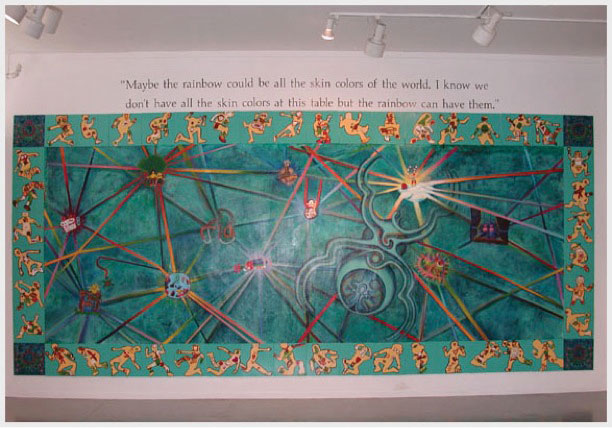
What resulted was “The Woven Web,” a mural that explores the individual histories and identities of each of the forty-four children who participated in the project, while also highlighting their shared experiences. This art project celebrates diversity and difference as well as the commonalities that bind us together as human beings. The project resulted in a rich learning experience for both the young children as well as for the project team. We were so impressed with the results that we decided to create this curriculum guide so that we could share this experience with other educators. This curriculum is designed to serve as both a story of our experience as well as a guide for educators interested in engaging in this kind of project. While this guide is based on our experience with kindergartners and first graders, this curriculum can be modified to fit various age levels. To that end, we have inserted observation notes in some sections so that you can assess whether or not a lesson plan might need modification to fit your classroom or group. Moreover, we have added some supplementary lessons so that you can extend this curriculum beyond the mural project itself, as we did.
We feel it is important to share the knowledge and experience we gained from this project, not only because of the extraordinary impact it had on the children, but also because we, as educators, gained so much from this process. This project taught us a great deal about the power of mentorship, strengthened our belief about the benefits of collaborative teaching and collaborative learning, and reminded us of the extraordinary, creative capacity of children.
-Rachel Estrella and Judy Baca
Process
Curriculum
The following is curriculum developed for the UES Woven Web Mural Project
Getting Started:
How to Engage in A Mural Arts Project – A Brief Overview
This curriculum manual focuses specifically on The Woven Web mural project and the lessons we devised to help our students understand issues of symbolism, metaphor, and representation while fostering a safe, cooperative, and engaging learning environment. However, we felt it would also be helpful to offer a general overview on how a community mural production process typically works. This will be helpful when deciding whether or not a mural project is feasible in your anticipated site. Keep in mind that this is a generalized outline and that each project takes on its own character, sometimes requiring deviation from or changes to this particular guide.
ESTABLISH YOUR BUDGET
• Before commencing your mural project, make sure you have both the time and money necessary to complete your project. Keep in mind what kind of mural you intend to create (permanent or movable), the surface you will be working on, and the size of the mural so that you can more accurately estimate the cost of the materials.
SELECT A WALL
• Find an appropriate wall in your school or community—make sure to get permission before moving forward with any mural project.
• Check the surface of the wall to make sure you can paint on it. Examine the surface—is it brick? Wood? Stucco? This will help you determine how easy or difficult it will be to paint on.
• Look for damage like cracks, peeling, water damage, grime, etc. Remember that water leaks, cracks, exposed pipes, or any other potential internal wall problems will eventually adversely affect the mural if you simply paint over them. You must repair any problems first. If you can’t repair it, then you must choose another wall.
• Notice the size of the wall. Is it manageable, in terms of your time and experience?
• Which way is the wall facing? Remember, the less exposure to the sun, the better. Paint can fade very quickly in direct light. North-facing wall exposure is the best.
(East gets direct morning light, west gets direct afternoon light, and south tends to get exposure all day long.)
• Be on the lookout for power lines, signage, or other obstructions that could not only impede the view of the mural, but could be potentially dangerous when painting.
• Ask yourself whether or not the wall is accessible to a lot of people.
• If you have difficulties painting directly onto a wall, consider a portable mural. These can be painted on canvas and chemically adhered to a wall surface, or you can paint them on plywood which are then framed and braced in the back and sealed and primed on both sides.
DEVELOP A THEME
• Your group or class must decide together on the theme of your mural. To get the conversation going, talk with your class or group about the issues that are important to them. Think about what issues are important to your school. Remember to keep in mind the mural site when thinking about themes. Think about the history of the site, its function, its place in the environment, etc.
DESIGN YOUR MURAL
Note: This is just one suggestion on how to go about the design process. As you will see from our curriculum, there are several ways you can tackle this. Just remember that the most important aspect is to get input from everyone and to honor that input in your design.
• Remember that you will want to incorporate everyone’s ideas into your design. One way to do this is to have everyone begin with initial sketches, based on what he or she would like to see on the mural.
• Share the initial sketches with the group. Have each person discuss his/her sketch and the meanings behind the images he/she created.
• At this point, the design can be created in different ways, depending on the direction you want to take with the design. One method would be to have the group put away the sketches and see which images pop out in the students’ minds. The images that are most vivid to them will most likely serve as the focal point of the mural.
• You can also group common images and find ways to link students’ drawings, or at least images within the drawings.
• Keep playing with the images. Remember that you do not have to use entire sketches from each student. You can take a piece from each sketch, for example. Make sure, however, that everyone’s ideas are represented. As you start to arrange and rearrange images, the composition you want will start to appear.
• When your basic design is done, you need to plan to enlarge it to the mural size, so make sure that your final drawing is proportionally to scale. Use a pencil to draw a grid over the drawing. Make sure to number the squares to make transferring easier.
PREPARE THE MURAL SITE
• Make sure the wall is clean. You can clean the wall with water and a scrub brush if its surface is not covered with paint or graffiti. If needed, you can also try water blasting, though that is usually done through a contractor. If there are many paint layers and/or graffiti on the wall, then you should have the wall sandblasted. (You will have to give the wall a final water washing when sandblasting is completed.)
• Once the wall is clean and dry, you will need to prime or gesso the wall. This will smooth out the wall by filling up holes with a gooey mixture. This will also create a proper surface to which the paint can adhere. The wall should get at least two coats of gesso, applying the second layer soon after the first.
• Draw grid lines onto your wall.
• One way to do this is to take a piece of chalked string along the wall, carefully making sure that it is level, and then snapping the line. This should leave a straight line on the wall. Make sure to use a level and a tape measure to make sure your squares are even.
• Number the squares to correspond to the gridded drawing.
• Participants can now transfer the design of the mural one square at a time. Do not fill in the drawings. Just sketch the outline.
PAINT YOUR MURAL
• Use high quality acrylic paint. If you must dilute the paint, then it should be done using equal parts of water and gel medium. Try not to use too much water to “extend” paint because this will cause the mural to fade very quickly.
• Paint as thinly as possible in uniform layers, since thick layers take a long time to dry.
• Keep a spray bottle with water on hand as it will help you keep paint moist and at the right consistency. Paint can be stored in aluminum tray palettes, sprayed and covered with aluminum foil.
• When you have completed painting, make sure to put protective coating on the mural (at least 4 coats.) Consider using an anti-graffiti coating system to make it easier to clean off dirt or paint from the mural in the future.
CELEBRATE YOUR MURAL!
• Completing your mural is an accomplishment to be celebrated. Make sure to have an inauguration ceremony for your mural. One way to do this is to have a ribbon cutting ceremony. Invite parents and community members and have some participants speak about the process.
Understanding Your Participants and Developing Relationships
The Collage Exercise
Our mural project brought together undergraduate students from a variety of disciplines with two classrooms of elementary school children. The plan was for the UCLA undergraduates to serve as mentors and aides to the children in helping them to uncover and express their ideas and put them to visual form. Before even beginning to engage in the process of design, we felt it was important for the students to get to know one another. We wanted the UES children to feel safe and supported by their UCLA mentors and we wanted the UCLA students to begin to develop relationships with these children as well as to get familiar with the ways that five and six year olds see themselves and their worlds.
The first exercise we did was called the “Collage Exercise.” We chose collage because we thought it would be relatively simple and it would allow more of the focus to be on relationship-building and trust-building.
Goals of the Collage Exercise
• To engage in an exercise which would allow the children to share their lives and their perceptions of themselves with their mentors (the UCLA students.)
• To begin the thinking process on representation. How many of the children would find the representations in magazines adequate for their needs? That is, how many of them would see themselves in these pictures? The idea was for the children to think about issues of difference/diversity couched in a way that allows the children to focus on themselves.
Lesson Description
1. UCLA students were asked to bring in magazines for the children to use as material. The children were then asked to look through the magazines to find pictures that would help tell a story about them—how they seem themselves, what they want to be when they get older, their likes, their dislikes, etc.
2. UCLA students were to help the children create their collages, cutting pictures when necessary, and helping the children glue the images onto paper. In the meantime the UCLA students asked the children questions that helped them to understand why the children chose their particular images.
3. After the collages were completed, the children shared their final products and explained why they chose their particular images.
Observations of Exercise
The relationship-building aspect worked very well. The UCLA and UES students enjoyed working with each other and getting to know one another. However we ran into some representation issues when it came to the materials we used. It seemed the children were more inclined to choose pictures of things they “liked” rather than pictures of things that represented them. Many collages included pictures of Star Wars characters, images which included favorite colors, or famous people the children liked. We did have some instances where students claimed they could not find anyone that looked like them (The pictures in the magazines contained images of people who were predominantly white. There were a few images of African Americans but those happened to be pictures of athletes involved in the Olympics.) There were also some instances where children drew images that they wanted as part of their collages but which were not found in the magazines (e.g. pictures of girls playing soccer.) One way to improve this exercise would be to really evaluate the materials used. Is there enough diversity in the images? To be sure, this issue is reflective of the broader issue of problematic media representations but if you choose to use this exercise, just be cognizant of the limitations and try to provide as much diversity in imagery as possible.
Alternative Exercises
The following are a few alternative exercises that you can do instead of or in addition to the collage exercise. It’s a great way of getting your students to think about their lives, the people in their lives, and their histories.
1) Create an altar that honors who you are.
• You may want to begin with a lesson on altars and how they are used to honor loved ones. Look to Chicano/a art or pictures of Dia de Los Muertos celebrations for images of altars. (Note: This lesson works very well if you can tie it specifically to Dia de Los Muertos.)
• Have the student bring in artifacts that represent important parts of their lives—the people in their lives, significant events, etc. Samples of artifacts that our students brought in were pictures of relatives, toys from their pets, karate belts, and medals from competitions.
• You may want to set size parameters for their altars. One way to do this is to have them use a shoe box as a pedestal. They can decorate the outside of the shoe box and then arrange their artifacts on the shoebox.
2) Create a memory box to collect important pieces of your history.
• This is similar to the altar exercise, only it does not have to take altar form. Have the students decorate a shoe box. This can be done in many different ways, using different papers, paint, markers, etc.
• You can either have them keep their artifacts in this box or open the box up and have it serve as a frame for a kind of diorama and the students can arrange their artifacts within the frame.
Note: This memory box exercise was critical to our process, as it served as the foundation for many subsequent exercises.
Supplementary Exercises
1) Journal entry about the lesson.
2) Write an essay about one piece in the memory box or on the altar. What is the significance of that piece? What does that say about you or the person it represents?
3) Write a story about a person or people represented in your altar.
Learning by Example: Mural Field Trips
Mural Field Trips
In order to get them thinking about the mural they wanted to create, we thought it would be helpful for the children to see a mural and to talk about its content, the messages the mural makers were trying to convey, etc. The Social and Public Art Resource Center (SPARC) often gives tours of murals throughout Los Angeles, but since we were working with young children, we had to consider their attention span and we were limited in our ability to transport them to too many mural sites. We therefore limited our mural field trip to one mural: The Great Wall of Los Angeles.
The Great Wall of Los Angeles is located in the Tujunga Wash drainage canal in Southern California’s San Fernando Valley, and it is perhaps Judy Baca’s most famous piece. Begun in 1976 with a team initially comprised of 80 youth from the juvenile justice system, 10 artists, and 5 historians, the Great Wall is the largest mural in the world, spanning 2,435 feet. It took over 7 years to complete and ultimately involved the participation of over 300 youth. The mural consists of a series of panels, grouped according to decade, depicting California history through the 1950s. Specifically, it focuses on the contributions people of color have made to history, highlighting events that, at the time of its creation, were rarely, if ever, discussed in our history books.
While the Great Wall gave us a great deal of material to work with, we were worried it would almost be too much. Given that the mural was over half a mile long, we wondered how we were going to sustain focus with the children. Judy had a brilliant idea: go on a metaphor hunt. By going on a metaphor hunt, we could talk to the children about notions of metaphor and symbolism and how artists use them to convey their messages. The metaphoric image also gave us a good launching point from which to discuss with the children the larger picture in which the metaphor was housed.
Goals of Field Trip Exercise
• To provide the children with an example of a mural in order to help start them thinking about their own mural themes.
• To use an actual mural as a launching ground to start discussions of visual narratives and the stories that murals tell.
• To teach the concept of metaphor and symbolism by pointing out and discussing the metaphors found in a mural.
Lesson Description
1. First, it is a good idea to read up on the mural you are about to visit. Consult books on muralism which may give you some background on the mural you wish to visit. SPARC is home to the largest digital mural archive in the United States, with information on murals located all across the country so you could also try contacting them to find information on a specific mural www.sparcmurals.com .There is a great deal of in formation available on the Great Wall of Los Angeles so we were easily able to obtain the information, condense it, and bring it to the children to discuss it with them before going on our field trip.
2. We chose specific images that we found in SPARC’s archives, like the cutting of a Native American’s braids or the Olympic torch, and we printed out those images. The UES children and UCLA students then broke into metaphor teams. Each team was given a picture of the metaphoric image that could be found on the Great Wall.
3. The teams went on their image “treasure hunt.” Once the children located the image, the UCLA students discussed the metaphor at length with the children as well as the significance of the metaphor in relation to the larger image in which the metaphor was embedded. Note that while each group was given one metaphoric image, the children saw all the metaphors used for the hunt. We took them down the entire length of the mural, discussing each scene, spending the most time with the scene involving the team’s chosen metaphor.
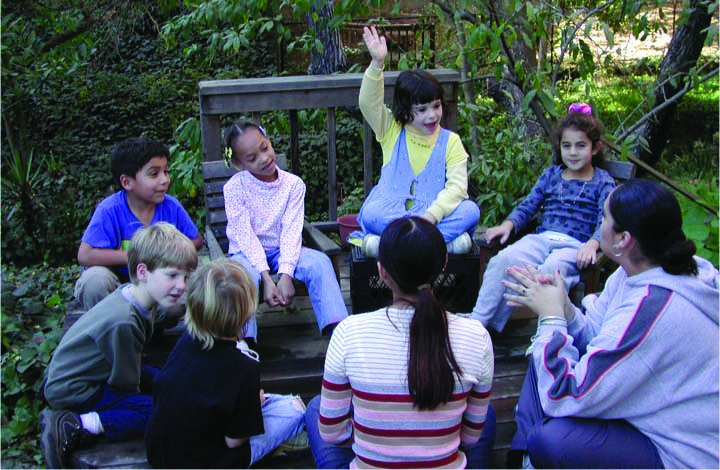
4. The children chose their favorite image, sat before the image and sketched it. We later sat in a circle and the children shared their sketches and explained why that particular image was their favorite.
Observations
Finding the metaphors was easy for the children. It was a good exercise in that it kept them engaged and focused—or at least as focused as we could expect from 5-6 year olds on a field trip. Journal reports from the team members indicate that the children understood the meanings behind the metaphors, and figured them out relatively easily. Some UCLA students also reported that their students felt troubled by some of the narrative, particularly the scenes depicting acts of racism and prejudice. The teachers felt it was important not to glaze over it and to speak honestly but in away that would keep them from being overly disturbed. The teachers emphasized the fact that these were events that took place in the past. We then focused on the idea that learning from mistakes in our past helps us to make better choices and provide a better future for ourselves and for those that come after us.
Supplementary Exercises
1. Journal entry about the lesson.
2. Take one event or image from the mural and write about that image or event. Complexity of this assignment will vary according to the age of the students with whom you are working. For example, one panel of the Great Wall depicts Albert Einstein holding an atom with one hand while on the other side of him are images of swords morphing into plowshares.
This image represented Einstein’s regret regarding the destructive ways in which his discoveries were being used, referring in particular to a statement that he made wherein he said that had he known how they would use his discoveries, he would have been a farmer. There are many ways you could create a writing assignment focusing on this image. Your students could write a biographical report on Albert Einstein. They could write a scientific paper about the effects of splitting the atom. They could also write a paper about the positive and negative aspects of scientific discovery and the ways in which science can be both beneficial and harmful to our planet and to us. Or, if they are very young, you could ask them to write about why they chose the particular image and what that image made them think about or feel.
3. Take one metaphoric image from the mural and write about the effectiveness of that metaphor in conveying the message, both in symbol and in emotion. Then create another metaphor, either visually or in writing (or both) that might convey a similar feeling and message. For example, on another panel of the Great Wall depicting the activities of the Bureau of Indian Affairs in the 1950s, an officer is shown cutting the braids of a Native American. Students could write an essay about what the cutting of hair represents. In the Great Wall, it represents the taking away not only of power but of dignity. Students could be asked to write about other stories that use the same symbolic reference (e.g. the story of Samson and Delilah) and compare the ways in which the metaphors are used in each story. They could also write about other ways in which artists symbolically depict the removal of power or of dignity, focusing on one painting or mural in particular. Finally, students may also want to visually create an alternative metaphor that might convey a similar message and feeling.
Finding Our Theme:
Uncovering the Woven Web
In the “Getting Started” section of this curriculum guide, we talk a little bit about developing your theme. We do not offer step-by-step instructions on how to come up with a theme because the theme must come from within each group of mural makers. As each group or class is made up of different people from different contexts, providing you with a set formula for how to come up with your theme would be inappropriate. Moreover, it violates one of the main precepts of muralism, which is that the theme should generate from the community in which the mural is housed as well as from the interests of the mural makers. We did, however, feel it might be helpful to describe our own process of theme-discovery, as it may give you some ideas on how to approach this step in the mural making process.
After our trip to the Great Wall of Los Angeles, we held several discussions with the children and their teachers. We talked at length about what they learned and what they were thinking about in terms of their own mural. The children were so impressed with the Great Wall that they wanted to build their own Great Wall, their own monument to history. The challenge placed before us was this: What does history mean to them? How can we ask them about their perspectives on the past when they have only been on this earth for 5 or 6 years?
We realized that the best way to approach this was to have them look at history from a personal perspective, i.e., to go inward and think about their own personal histories. But while this mural would depict the personal histories of its participants, we also needed to think about how it would reflect the community in which it was to be housed (i.e. the school itself.) We talked to the teachers about the mission of the school, about the goals it had for its students and the kinds of pedagogical ideals to which they subscribed. One of UES’ main commitments is to diversity and to the celebration of difference. We thought that by engaging the children in studies of their own personal histories and helping them visually represent those histories, we would be celebrating all the things which make each student unique. But we also felt it was important to highlight the things that we all share as human beings, things we had in common.
At that point we had what we wanted our mural to reflect, but we were still uncertain as to how to do it. Judy said that we needed to find a central metaphor, something that would help us to tie it all in. We all came up with several ideas, none of which really resonated with everyone. Judy suggested we go back outside and look at the wall, saying that perhaps we would find some inspiration by looking at it. We brought the children outside to look at the wall. We stared at it for a few moments when some of the children started jumping up and down and pointing to something on the upper left-hand corner of the wall. “Ms. Rosenthal! Ms. Rosenthal!” they cried, “There’s a spider! There’s a spider!” Thinking that they were afraid of it, I tried to reassure them that it would not hurt them but they said “No! It’s like the story! It’s like Charlotte!” The teachers were apparently reading “Charlotte’s Web” to the children.
Right then, it hit us. A spider! A spider can be the central metaphor and her web can be the thing that ties us all together. We started talking about folktales like Ananse, which portray spiders as weavers or givers of life. Immediately, the teachers started talking about books about spiders that they could gather and read with the children. They also talked about creating biology lessons centering around spiders and the UCLA students offered to help find spider images and offered to do the readings of the spider books.
From Theme to Design
Meanwhile, Judy was already thinking about the design. She suggested that each child could work on the monument to his or her own history and place his or her design on a square tile that would measure 1’ x 1’. We would then use those tiles as a frame, wrapping it around a canvas that would serve as the central part of the mural. On the canvas we would paint the spider and her web would connect all the tiles to each other.
It is important to note that part of Judy’s design concept came from her careful consideration of the age of our young muralists. Having been an art teacher for many years, Judy said that the children’s fine motor skills were not developed enough for them to be able to paint directly onto the wall in a vertical fashion. In addition, the wall was too high. We did not want the children to be climbing on ladders, but we also did not want all of the imagery to rest at the bottom of the mural, where they would be able to reach. Judy felt that painting on smaller tiles would be easier for them. They could rest their elbows and hands on the table as they worked, giving them more control over the brush. Moreover, she had had great success on mural projects where they painted on canvas and then chemically adhered the canvas to the wall. Judy’s vision was that we could let the children crawl around on the canvas in order to paint it.
So we had our theme: celebrating difference and diversity while highlighting those things that bring us together as human beings. And we had our design concept: Each child would paint individual tiles that would represent their unique personal histories. These tiles would then surround a canvas mural in which a spider and her web would be the central feature, with the web connecting all the tiles to each other. At different junctures along the web, the children would create symbols that would represent things that they had in common with each other.
Once we had our theme and design concept, we had to set about finding a way to help the children convey their ideas and their learning into visual form. We needed to work with them in opening up various modes of expression as well as in really understanding concepts of symbolic imagery. For children of five and six years of age, this was a great challenge and it is what makes up the bulk of our lesson plans in this curriculum guide.
A Note on the Tiles:
The individual tiles that the children would create were to serve as monuments to their own personal history. That concept alone is too big and abstract for children that age to work with so we needed to give the assignment some structure and boundaries which would not only help the children but would further unify the piece. We thought about how history manifests itself in children and talked about how their histories lie in their memories. Judy’s friend, artist and teacher Tania Godoroja, suggested an exercise that she had successfully implemented with young children—mapping the body with their memories. We would make outlines of the children’s bodies in different poses and then begin the process of placing their memories, their histories, within those bodies.
Lessons In Expression: The Body as a Vehicle for Expression”]
Our first task was to create the outlines of the children’s bodies, which the UCLA students would then reduce and transfer onto ceramic tiles. We wanted to help the children find creative and fun poses that we could then capture on paper. Having had a background in the performing arts, Rachel thought this was a perfect opportunity to create a lesson plan that would get the children to think about their bodies as vehicles of expression.
Main Goals of this Lesson Plan
• To have students begin thinking about different ways to express themselves through the use of their bodies. The UCLA team was asked to lead the UES children through exercises that would expand their ideas on how use their bodies as tools for expression.
• At the end of the exercise, the children are asked to think of their favorite pose. They try to recreate it by lying down on paper, having their limbs touch all four sides of the paper. UCLA team traces the student, creating an outline of their forms.
Lesson Description
There are 6 stations of exercises that students will go through. Students are placed in teams to go through all the stations. Students rotate through the first five stations (it does not matter where they begin) then enter discussions with their UCLA team leaders about the exercises and their experiences through those exercises. They are then brought to the 6th and final station where students create their favorite poses and put those poses on paper.
Station 1: Sculpture and Narrative Station
Two students work together in a team: one student is the sculptor, and the other is the person being sculpted. Sculptor moves different parts of sculptee’s body to form a “sculpture” of that person. When the student is satisfied and his/her sculpture is finished, the sculptee holds his/her position while Sculptor narrates what that sculpture represents and (depending on age group and ability) tells a story about the sculpture. Students then switch places and repeat the exercise.
Goals:
• To exercise spontaneous narrative skills in students.
• To visualize the possibilities inherent in bodily expression through the use of another person as a canvas.
• To develop cooperative learning skills.
Station 2: Mirroring Station
Two students work together in a team: One begins as the “leader” and the other is the “follower.” Leader begins slow motions, contorting his/her body in different ways. Follower mimics Leader’s movements as precisely as possible. Students switch places and repeat exercise.
Goals: * To teach observation skills, encouraging students to study each other in detail.
* To develop cooperative learning skills.
Station 3: Monkeybar / Apparatus Station
In this exercise, students will use playground apparatus (e.g. jungle gym, monkey bars, etc.) to create unusual body positions. They will then try to replicate these positions on the ground without the use of the apparatus.
Goals: * Exercising kinesthetic memory.
* To encourage the children to see every day objects as possible resources for creative inspiration.
Station 4: Music Station
In this exercise, students move to music, using the sounds as inspirations for creative poses. One UCLA team member monitors the music while another participates in creating movements with the students. Periodically, the Music Monitor stops the music and all participants in the exercise freeze. Students are asked to notice the positions of their bodies and the body positions of their peers and to make comments.
Goals: * To increase bodily expression through the inclusion of music.
* To expose children to different forms of music from different cultures.
* To incorporate two (music and dance) art forms in order to create one expressive outcome.
* To develop cooperative learning skills.
Station 5: Emotions/Adjectives Station
In this exercise, students “act out” emotions and use their bodies to try to express different adjectives. Students are told to think of an emotion that they can try to convey using only their bodies as a tool. They then create a line and the person in the front of the line attempts to convey the emotion as team members try to guess the emotion. Alternatively, UCLA team members can choose an emotion for each student. As the student reaches the front of the line, the UCLA team member states, for example, “Show me angry. What does angry look like to you?”
In terms of adjective description, UCLA team members pick certain adjectives that they feel might be interesting (and feasible) to act out. Students then describe those adjectives using their bodies. For example, team members can ask students “What does prickly look like?” After students form their poses, they are asked to look at each other as well as to remember their own body positions.
Goals:
• To use a tool other than text in order to explore language.
• To develop cooperative learning skills.
Note: What we did not do, which might be a good exercise for students, is to have each student choose a person whose pose s/he likes and describe why s/he likes it. This exercise would exercise critical skills as well as encourage students to pay attention to detail and to each other. It might also facilitate student creativity because they would be learning from each other and trying to incorporate other people’s ideas into their own. On a social level, it will encourage students to positively reinforce each other and appreciate the talents of their peers.
Pre-Station 6 Discussion
UCLA team leaders enter into discussions with the students about the exercises. Using inquiry methods, they probe students to think about the exercises as well as the poses that resulted from those exercises. Examples of questions team leaders would ask are:
• What was your favorite exercise? Why?
• Do you recall your favorite pose? What was it? Demonstrate it for the group. Why was that your favorite pose?
• What do you feel you have learned from this exercise?
Station 6: Final Station: Drawing the Pose
After having worked with team leaders to remember and discuss their different poses, students try to recreate those poses on paper. These pictures will form the foundation for the “mapping memory” exercise, as they will be mapping memories within their bodies. Children will be asked to touch all 4 sides of the paper in their pose. Students will have to think about how to reposition themselves so that they can represent it two-dimensionally. Students can then lay on the paper in their particular pose (or stand with paper behind them, depending on pose and size of paper) and team members outline their bodies using pencil (and then re-tracing with black felt tip pen.) Teachers must use discretion in terms of sizing the paper, but all paper sizes should be uniform for the whole class. Note that it will make it much easier if the size of the paper is proportional to the size of the object upon which the drawing will be transferred. For example, since we were going to transfer the outlines onto a square tile measuring 1’ x 1’, the children made their outlines on 4’ x 4’ cuts of butcher paper. This made reduction and transfer of the drawings much easier. We transferred the outlines by drawing grids on the butcher paper outlines as well as on the tiles an then re-drawing the outlines square by square onto each tile. (Transferring can also be done using a projector and minimizing the image, depending on the resources you have available to you.)
Lessons in Symbolism: Notes on our Process
Lessons in Symbolism
The next section of this curriculum guide centers around our Symbolism lesson plans. You will note that we have multiple lessons, using various different media. We did this for a number of reasons, the first being that symbolism is a difficult concept to teach, particularly to five and six year olds. Secondly, we felt that using a variety of media would help the children find different ways to express and symbolize their memories. Activities such as painting or drawing limited the imagination to two dimensions and the children then deferred to the use of images commonly used by children their age, e.g. a sun or happy face. Because of the unique nature of this curriculum, for the most part we will be laying out the lesson plan as it unfolded (rather than presenting a step-by-step instruction manual.) By reading how we moved through each lesson, you might think of ways you could copy the lesson or modify it for your students. You will also see what we as a team learned along the way and how this process broadened our own understanding of the way children think.
We began by having the students create and decorate a memory box. In that memory box they placed objects that represented an important person or event in his or her life. Examples of objects were medals from martial arts tournaments, a dog’s ID tag, and a toy given by a favorite cousin. With each symbols exercise, we learned more about how children this age process information and express their ideas. Moreover, we learned more about them as people. We learned about their lives, about things they feared and things they loved. And each time we did a new symbols exercise, the children’s work became more and more complex, as did their thinking. This was exciting to all of us on the team. After all, this wasn’t just about the final mural piece, but also about the process of learning throughout this project.
Symbols I Exercise: 4 Media
Goals
• To engage in exercises that get students to think representationally and abstractly in order to create their own symbols of emotions which are linked to particular memories.
Lesson Plan
1. Begin with a lesson about symbols. Of course, the level of complexity of your symbols will vary according to the age of your students. Because our students were so young, we began with every day symbols, like stop signs or restroom signs. You can also begin with symbols used in other cultures and see if the students can decipher the meaning behind each symbol.
2. Again, depending on the age of your students, create different media stations for students to create their symbols. Below, we outline our lesson plan, which involved using four stations. This proved to be a little challenging for children in the 5-6 age range for various reasons (see observations notes). We therefore had to modify and focus on one medium at a time (see Symbols Lesson II – Wire). However, for students who are a bit older, this is a great exercise.
Supplementary Exercises
1. Journal Entry about the lesson.
2. Have the student write an essay describing, in detail, the symbol he/she created. What was the inspiration behind this creation? Why did s/he choose that particular medium? What about the color choices? Was there an emotion the student was trying to evoke?
3. Have the student write a fictional story about the symbol or object.
Preparation for our Lesson:
Explaining Symbols:
I began the lesson with symbols that the children may have seen in every day life, for example the “handicap” symbol, the symbol for men and women as used on restroom doors, the red hand on stop signs, etc. I then asked the children to identify the symbols that were presented to them and asked then if they could explain why each particular symbol represented that particular object or idea. For example, what is it about a red hand that makes one think to stop? Each member of the UCLA team presented two different symbols from various cultures discussed them with the children. (If you are working with very young children, you might want to limit the number of symbols to 4 total, as offering too many may cause them to lose focus.)
Symbols Activity: 4 Stations
After the symbols preparation exercises, the students were asked to go to their memory boxes and choose a memory that evokes a certain emotion. They were to describe the emotion and choose a media station wherein they would create a symbol for that emotion. There were 4 media stations:
• Wire
• Clay
• Pastels
• Tempera paints
There were approximately 4-5 children and 2 UCLA students per station. The UCLA students were asked to assist children with the materials as well as to help the children think about their memory object and conceptualize how to create symbols from the emotions evoked by the object. Some examples of the children’s symbols include:
• Cooking Pot – (1) Miina took from her memory box a doily, which she said reminded her of her grandmother because she and her grandmother used to cook together. She said the doily made her feel sad because her grandmother lives very far away (Finland.) To symbolize this feeling and this memory, Miina created a pot from clay. Within the pot she placed a heart. She was so moved by her creation and the memory of her grandmother that she started crying at the end of class, stating that she really missed her grandmother.
• Suns – (1 ) Several children at the clay station drew suns onto their clay pieces. The suns were to represent “happy.” It was interesting that most children chose to draw on the clay rather than make an object with the clay. Another boy did a variation on the sun. He drew another sun into the clay, embedding the clay beneath the sun with dots. He claimed that the picture was of a sunset and it was to symbolize “sad.” It was rather intricate and well thought-out.
Observation Notes:
It seems that the children were not as successful in creating symbols using 2D methods (painting and pastels.) In those media, the children resorted to static symbols, i.e. “happy” = happy face or a rainbow. The UCLA team had a difficult time getting the students (with a few exceptions) to move beyond these static symbols, even with the aid of their teachers. The teachers stated that they feared this would happen and felt that using 3D methods would be easier for the children in terms of their ability to think beyond simple representations because it would force them to conceptualize things in a different way.
Clay produced strange things for both age groups. The kindergartners who used this medium seemed insistent on creating food. When probed as to the reasons behind their creations, the answers seemed to be created solely to please the students. All the children symbolized “happy” with their food and it seemed more like they were playing with the clay than focusing on the task at hand. Interestingly, it also seemed that most of the first graders “drew” on the clay rather than using it to mold an object.
As a solution to these issues, their next symbols lesson will involve the use of only one 3D medium (wire.) We will try again with clay as well. Perhaps after time and with more exercises and better inquiry strategies we will have better results.
Symbols II Exercise: 1 Medium–Wire
Goals:
• To engage in exercises that get students to think representationally and abstractly in order to create their own symbols of emotions which are linked to particular memories.
• To have the students work with one 3D medium to evoke different modes of thinking. We found, from our previous exercises, that work in two-dimensional media (paints, pastels, etc.) limited their engagement with the project. The children resorted to typical symbols, like happy faces and rainbows. We hoped that working in wire would help them move beyond those paradigms.
Lesson Plan
1. Depending on the age of your students and your gauge of their level of understanding, at this point, of symbols and metaphor, you might want to do a little refresher exercise (see our example below).
2. Choose one medium with which to work, preferably one that is more tactile, like clay or wire. We chose wire because we thought it would get the children to think more abstractly about representation because, even with clay, they were drawing upon common iconography, using the clay to either sculpt things like happy faces or suns. Some simply drew onto the clay, which made its use as a tactile medium less effective. It is important to note that we used a variety of wires that differed in color, width, texture, etc.
3. Choose a focus for this lesson. In our lesson, which we describe below, we were interested in expanding their range of emotional expression so we focused on having them create symbols that represented different emotions. Alternatives might be that you could have them create a symbol that represents a particular memory or a particular character trait that is unique to that student. You could also have them create a symbol that represents someone important in their lives or someone who serves as a role model to them.
4. Note that you can do this exercise over and over again, using different media and different lesson foci. Doing so will help to develop their range of expression and will ultimately result in a more complex final product.
Supplementary Lessons:
1. Journal entry about the activity.
2. Write a narrative explaining, in detail, the object the student created. Have the student explain his or reasoning behind every aspect of his or her creation, including color, size, etc.
3. Write a story where this symbol plays an integral role, or write a story about the memory or person that inspired this symbol.
Our Symbols Exercise:
Explaining Symbols:
One UCLA student explained symbols given to her by Judy Baca. These symbols were from various Native American tribes and they signified things like
• War
• Daughter
• Talking
• Fighting
Symbols Activity: 1 Station – Wire
During our last symbols activity, we asked the children to talk about what their symbols were, what memory it was linked to, and how that memory or symbol of that memory made them feel. We found that the emotions were often limited to “happy” and “sad.” We decided to see if we could actively expand their repertoire of emotions in order to see if we could add depth and complexity to their emerging symbols.
A “bag of emotions” was prepared for the children prior to the class. Different kinds of emotions were written on small pieces of paper in both Spanish and English. The following are just a few examples of emotions included in the bag:
• surprised—sorpredido/a
• anxious—inquieto/a
• lonely—solo/a or solitario
• confused—confundido
• amazed—asombrado/a
• excited—entisuasmado/a
• angry—enojado/a
• ashamed—avergonzado/a
The children sat in a circle as the bag was passed around. As each child chose an emotion, the child was asked if he or she knew what the emotion meant. If the child did not know the meaning of the emotion, the other children were consulted to see if they could help define the emotion or give examples of an instance wherein that emotion could be applicable. When the child felt comfortable with the emotion he or she chose, he/she went to one of the tables to work on sculpting a symbol using different forms of wire that represented that emotion.
There were approximately 4-5 children and 2 UCLA students per table. The UCLA students were asked to talk to the children about the emotions they chose. The students’ task was to engage the children into thinking about instances when they felt that particular emotion and then linking it to a symbol that would represent the emotion or a memory connected with that emotion. The UCLA students were also asked to assist the children with the materials, as the manual dexterity of these 5 and 6 year olds was not very advanced. The children were allowed to cut thin wire but UCLA students took care of thick wire that required the use of bigger scissors.
Results
The team of UCLA students and UES teachers all agreed that this lesson was a great success. We were amazed at the depth of thought behind each child’s symbol. The following are excerpts from field notes and some of the UCLA student’s journals that discuss the kinds of symbols created and describe the children’s creative process.
Kaela’s “Excited”
“The symbol sculpting exercise went really well, the best out of all the times. It was extremely difficult to get them to choose anything other than a synonym for happy, though. Actually, it was near impossible. Kaela chose excited and made an image of her very first roller coaster ride. The girl sitting next to her also chose excited and before I knew it, they had both made roller coasters. I don’t even know whose idea it was first. They both started accusing each other of copying. Kaela is really creative, though. She had an explanation for every little piece of wire she used. One part I thought was interesting was how she added those circular spiral wires to it. She explained this as being the part of the roller coaster where you go upside down and around and that it represents fear. I asked her why she brought fear into her piece of excitement and she said that at first, she was really scared and didn’t want to go on it. But after her father and ‘everyone else’ went with her, she got really excited and ended up loving it. She also added wires for the mechanical underbelly of the coaster, the water underneath the ride (blue tape), the people waiting in line, and so forth. She actually didn’t want to stop and just kept adding and adding and adding. She is such a perfectionist.” – Shinobu Price.
Brenden’s “Scared”
“Brenden was making the emotion of being scared—‘so scared that he’s paralyzed and can’t move!’ He clenched his teeth to show how paralyzed he was. So, with the wire, he created a face. A popsicle stick was the mouth and he simply drew a line across it with vertical lines going down. The person’s hair was sticking up and red because of his fear. I couldn’t convince him to only use wire, so he also used the tape to make the red hair, and I thought the teeth were good, so I didn’t choose to tell him to change them or to try to do them differently.” – Carolina Sarmiento
Gabriella’s “goofy”
“Gabriella chose goofy because, in her words, ‘I’m goofy.’ I asked what she looks like when she is goofy and she started contorting her face and laughing and jumping up and down. It was so cute. She began twisting together wires of all sorts of colors. This, she said, is what she does when she’s all goofy—she spins around and around. I asked what all the colors were for and she said that she likes to wear different colors and then proceeded to point out the matching color on her outfit to the corresponding color of the wire. She found a tiny, dried leaf on the table and stuck it to her sculpture. I tried to get her to use only wire, but she answered with the greatest response. She said that sometimes when she gets all goofy-like, she starts spinning around on the ground and gets all dirty and covered with leaves. How creative are these kids! They’re like tiny abstract expressionists. I’ve learned not to butt in too much with their work, because they all seem to have deep-rooted, complicated artistic visions and don’t like others to get in and mess it all up.”
-Shinobu Price
Chloe’s “Sad”
“Chloe made a bouquet of flowers to represent ‘sad.’ The flower stems were made of wire and she covered the tops of the stems with colored tape to represent the flower buds. She said that the flowers made her feel sad because it reminded her of when her grandfather died. Chloe’s father told her that you can give someone flowers even if you’ve never met him. I thought this was a particularly interesting and appropriate symbol because she connected the emotion to her past and thus to herself and her family. – Rachel Estrella
Symbols III Exercise: Performance
Goals
• To engage in exercises that encourage students to think representationally and abstractly in order to create their symbols infused with emotion and linked to particular memories.
• To revisit the concept of using the body as a vehicle for expression via the use of performance techniques. Studies have shown that sociodramatic play may help increase comprehension and memory retention. We hoped that by using drama techniques, the children would gain a deeper understanding of emotions as they are linked to memory processes. Drama techniques call for the use of different senses, allowing us to increase and diversify the learning modalities used by the children and hopefully access the children’s different ways of knowing.
• To engage the children in exercises that encourage them into thinking about the wide range of emotions a human being is capable of feeling. The ultimate goal with our emotions exercises was to help the children link memories and symbols with emotions in order to bring depth to their work.
• To have the children work together on a collaborative project so that they may learn the value of teamwork and cooperation.
Notes on Lesson Plan:
Depending on the age range of your students and your time frame, you may or may not wish to engage in this particular exercise. We found it to be fun and creative and it was a good way to get the children to collaborate in their creations. We are focusing again on emotion, not only because we wanted to continue working on range of expression, but also because this proved to be a good topic for kids this age. Talking about emotions, for example, served as excellent launching points for writing exercises or for getting the children to talk about school ground behaviors that were bothering them.
Because this particular exercise involved a great deal of improvisation on the parts of the students, we will not write out a specific lesson outline. Rather, we will describe our own process which you can mimic or modify to your own needs.
Symbols Activity—Performance of Emotion
We began by reviewing the vast array of emotions that we had covered in previous lessons. The children were then divided into groups, with approximately four children per group. Two UCLA mentors were assigned to each group. Each child was asked to pick an emotion and told that, within each group, each child must have a different emotion so that there was no overlap of emotions within the group. The UCLA students told the children that the goal of this exercise was to be able to create a performance out of these emotions. The children could choose to create a dance, a song, or a play. All children chose to create a play.
The role of the UCLA students was to facilitate the creation of the plays. All ideas, plot lines, and dialogue came from the children themselves. The UCLA students used inquiry methods to help the children find their ideas and employ them. Moreover, they helped the children work together and resolve creative conflicts while still preserving their ideas and teaching the children to respect each other.
Results:
This proved to be a very successful and fun activity. The plays varied greatly in plot and were incredibly creative. The children enjoyed receiving applause for their work and they were very proud of themselves.
Traditions/Family Memories Homework
Goals:
• To involve parents in the process of memory gathering.
• To have the children begin to explore their own family histories by uncovering a family tradition or memory and sharing it with the rest of the class.
• To acquaint the children with traditions from different cultures and to provide them with exercises that may help them learn more about each other. Through this exercise, we hoped that the children would discover the many ways that they are different from each other while still seeing how they are the same. We hoped to foster between the children a better understanding of each other and an awareness of the diversity of the world around them.
Lesson Description
The conceptualization and creation of this mural took 20 weeks to complete. After the first 10 weeks, the UCLA students had a winter break which lasted 3 weeks. The students were concerned that during the break, the children might forget much of what they were taught in the first quarter. We decided to create a homework assignment that would encourage the children to continue to think about the concepts of memory, narrative, and symbolism while exploring their own family history. The following letter, which explains the concept of the assignment, was sent to the children’s parents before the beginning of winter break:
Results:
We learned a great deal about the children and their families through this exercise. Quite a few children created pieces that taught us about their homelands. Others decided not to create a piece about a family tradition but rather chose to paint a picture of a symbol which represented a favorite memory from their winter break. The children presented their work to each other and some parents were present for the presentations. We were all impressed by the thoughtfulness of the pieces created by the children and their parents and were moved by the obvious pride that the children and their families displayed when sharing information about their cultures with the other children.
Journal Observations from UCLA Students:
“The presentations of the children were very insightful to me. I learned many things about them that I would otherwise never have known. I think that if all of the children do presentations or stories about themselves and their family traditions this will help us in forming groups with a commonality. Another thing I noticed is that the children immediately recognize when they have something in common with another child. Adam couldn’t sit still when Eli was presenting because he shared the tradition of Hanukah with Eli.” – Vi
“I think after all this time, finally, today, I felt that we got to know the children more deeply. I realized there’s so much that we don’t know about these children….until today, I felt we barely scratched the surface of these children’s backgrounds. Some students I feel have really developed their symbolic thinking” – Carolina
Learning to Use Our Materials
At this point, we felt we had done a great deal of work with the children in terms of their understanding of symbols, of memory, and of the relationship between emotion and memory. We were ready to begin production. However, given that these children were so young and their fine motor skills were still developing, it seemed prudent to talk with them about how to use and care for the materials they were going to use for the project. We also wanted to teach them some rudimentary lessons in technique and in the understanding of color. If you are working with older students, this lesson may not be as useful to you. If you are working with young children, there are many fun ideas within this lesson plan that you might find very helpful.
Goals
• To teach the children the proper way of handling and caring for the artistic materials they were to use in their project.
• To teach basic concepts in painting practice (e.g. how to mix colors, what kind of brush to use for different situations, etc.
• To teach the children respect for their work, their resources, and for each other.
Lesson Plans
Colors Lesson:
There were three main topics we wanted to cover with the children regarding their color lesson:
1) The difference between primary and secondary colors
2) Mixing techniques and practical issues regarding color mixing.
3) Warm colors versus cool colors.
One prop that proved useful to use is a color wheel. You can get a color wheel from an art supply store or you can make one on your own.
The color wheel, for us, was helpful in showing them not only the difference between warm and cool colors, but also in talking about complimentary colors.
When discussing color mixing, we decided it would be more fun and interesting for the children if we made the lesson plan interactive. We began by talking about the difference between primary and secondary colors. Then we took jars filled with primary-colored water (we used food coloring) and asked students to guess how to make different colors, like green or orange. We let them make guesses and we experimented with each guess to see how it would turn out, even those guesses which we knew to be incorrect. Each incorrect guess allowed them to problem-solve in order to find the correct solution. We also used this technique to discuss with them how to make certain colors deeper or lighter.
Brush Lesson:
Our primary goals for the brush lesson were to:
1) Show the children how to choose the correct brush for their image (rounded versus squared,
big vs. small)
2) How to use the brush. There are certain ways to hold a brush that allows for a steadier hand, but we did not go into great detail about that with the children, since they had a lot to deal with already. We instead chose to focus on how not to mistreat the brush (young children have a tendency to press down very hard on brushes, which can damage the bristles) and how you can achieve what you want using gentle strokes. We also wanted to show them how much paint to put on the brush itself. We noticed in our previous exercises that the children tended to put so much paint on their brushes that it not only damaged the brushes, but it made it more difficult for them to work on the finer details of their image. In addition, the children had a tendency of getting paint onto the brush handle and not leaving it to just the brush area, which wastes paint.
When conducting this lesson, our primary strategy was inquiry-based. That is, we began with a blank canvas and asked the children to predict what kind of brush they would need if they wanted to:
• Paint a sky?
• Paint a person?
• Paint a house?
We asked if they would use a big or little brush and why, or a rounded or squared brush and why. Then we tried each brush out to see its effects. We also incorporated into the demonstration a discussion of the amount of paint necessary to achieve the effect they wanted. We brought in damaged brushes and passed them around to show the children what happens to brushes when they are misused.
Painting Etiquette and Technique Lesson
As an interim project a few weeks earlier, we had the children paint their favorite memory from their holiday break. We did this exercise to figure out what we needed to address in terms of the materials lesson. We watched how they handled their paint, paintbrushes, and each other and we had some concerns. We decided to address these concerns through a skit-based lesson. One of our UCLA students, Carolina, served as the “novice ” (and careless) painter, while Enrique, a SPARC staff member, served as the “expert” (and careful) painter. We set the skit up as a kind of freeze improv. Carolina would begin painting and every time she did something that could be improved, e.g. not drying her brush before putting paint on it or putting too much pressure on the brush (i.e. smashing it against the paper), we would freeze the play and ask the children what Carolina might be doing wrong. Enrique then demonstrated the correct method, after having a discussion with the children.
The following are the topics we focused on in our skit, based on our observations. Of course, you can modify the topics according to the age range of your students and the issues that you think might come up.
1) Problematic brush cleanup – We noticed that when the children put their brushes in their jars of water to clean them, they were a bit too vigorous in their “swishing.” This caused the water to splash out and ruin the student’s painting and/or get on other people’s paintings.
2) Too much paint on the brush – the children sometimes dipped their paintbrush too far into the paint and got paint on the handle of the brush. This was not only wasteful, but it caused a few accidents (i.e. paint would then get on the children’s hands and find its way to their paintings.)
3) Paint your picture, not yourself – It is important to remind the children to wear clothing that they can ruin when they paint. Moreover, it is critical that this clothing not be too loose. A few of the children were using a parent’s old shirt as a kind of apron, which was great because it covered a good deal of their clothing, but which became problematic because the loose folds, e.g. at the elbow, kept finding their way into the paint, which would then accidentally find its way onto the painting.
4) Your painting is not a coaster – During this project, we often got so caught up in the interesting ideas that the children came up with, that it was easy to forget how young they were. As we began painting, we were quickly reminded about their age, not only because of their level of manual dexterity, but also because of their focus (and how easily it shifts.) There were times when the children put their water jars on top of the paintings, rested their paint-filled brushes on the painting, or put their paint trays on top of the painting.
5) Dealing with mistakes – Some of our little students were real perfectionists and had set ideas about what they wanted to create. Unfortunately, when they didn’t like their painting, they had a tendency to flip the paper over and start again on the other side, leaving a mess of paint on their table.
6) Change is good! – We noticed a lot of children chose one paintbrush and stuck with that brush for the entire painting, regardless of the nature of the image they were trying to create. What resulted was a child spending half an hour trying to fill in background with a very tiny brush or another trying to paint raindrops with a really big brush. (This, of course, just reinforces our “brush lesson,” which we conducted earlier.)
7) Mudbusters! – Children love to mix things, especially colors. In previous painting projects, before our extensive lesson on color mixing, we ran into the problem of children ending up with the same, muddy, grayish-brown color on their palettes. This happened because the children were incredibly excited about mixing colors and experimenting that they often did so without thinking carefully about what they were mixing and why they were mixing it. Moreover, they would forget to clean their brushes before starting to mix (or perhaps they were just so excited that they did not want to.) So when trying to make green, a child would take blue from one part of his palette and put it in one area, then take yellow and put it in that same area without cleaning the brush in between. The yellow would therefore get “contaminated” with blue for the green-making or red for the orange-making and soon, all colors lost their original integrity and started looking that brownish-gray color.
8) Be respectful of other people’s work – Our students were very helpful little people, some of whom had very healthy opinions. These students sometimes offered up their ideas to their peers by directly painting onto their friend’s piece to demonstrate. We wanted to remind the children to respect each other’s vision and neither to criticize nor alter their friend’s painting.
Lesson Applications: Still Life
After having conducted the materials lessons, put our lessons into action via a still life painting. As the children painted their stills, the UCLA students carefully observed the children, gently reminding them about helpful techniques, when they felt it was necessary. We were all impressed by how much more careful the children were and their care really came through in their paintings. Their colors were more vibrant, their images more clear and there was no water-logging of paper. We did two still life assignments with the children, just to make sure that our lessons stayed with them, before we started working on the mural.
Supplementary Lessons
1) Journal entry about the lesson—perhaps give them a prompt, asking them what some of the more salient lessons were to them and how they will apply the lessons to their future work.
2) You can make a science lesson out of the color-mixing activity. One way to do this would be to put up a color and have the students predict what colors would go into the creation of that color and at what proportion (if you have older students, choose a more complex color like mauve or aquamarine). Have them test out their hypothesis and write up the experiment, including any modifications they would have had to make in their mixture. In their write-up, you might want to ask them to explain their thought process as they modify their color mixture until they come up with the correct color. Remember that color mixing is not as easy as it seems, so exact accuracy should not be the main point of this lesson as much as using scientific method to predict and examine an outcome.
Mural Production: Designing the Tiles
At this point, we felt quite successful with our lessons in painting techniques and care of materials as well as in our symbols work. We were ready to work on the outer part of the mural – the creation of the individual tiles that would serve as the mural frame. Remember, in our design, the children were to put their own personal histories onto their individual tiles, designing symbols that reflected important aspects of their lives and mapping those memories onto their bodies. Because it can be difficult for a five year old to pick and choose important events and remember them and be consistent with those choices through the life of this project, we thought it would be best to have them refer back to the memory boxes they created earlier in the project. (They were allowed to make changes to the memory box content, if they so wished.) This way they could spend some time carefully choosing their memories, but then contain those memories in their boxes to remind them and help them focus through the rest of the project. After working with the memory boxes, then we were able to conduct our lesson on mapping memory.
Goals
• To have the children collect their histories in tangible form and store them in memory boxes so that they could easily revisit them and use them as references for their imagery.
• To have the children express their ideas and memories in visual form.
• To help the children link their memories to emotion and emotion to corporeal representation which will then help them to map their memories to specific parts of their bodies.
Creating Memory Boxes
The children wanted some guidance on things to place in their memory boxes. These are some of the suggestions we made:
• Find an object that symbolizes their roots. Where were they born? Where were their parents born? What symbol or artifact reminds them of these places?
• A special event: Birth, death, wedding, graduation from pre-school….
• A family tradition. For example, something done over the holidays or a ritual you perform at mealtimes or bedtime, etc.
• Sprituality: Does the child belong to a particular religion? Is that religion observed in the house? What objects would represent that religion to the child?
• A major accomplishment: Some of the accomplishments that the children in our group were exceptionally proud of were winning a karate tournament, learning to swim, and learning to ride a bike.
• A bond with a special someone: Grandma? Best friend? Dog?
• Hobbies or interests: we found that many of our children were engaged in outside activities such as dance classes, martial arts, and chess.
Designing the Tiles: Where does memory lie?
At this point, the children had their memory boxes, in which lay objects which reminded them of a specific memory, a special person in their lives, or a former homeland. They would refer to their memory boxes when designing their tiles. But first we had to discuss with the children how to think about the positioning of their symbols within their body outlines on their tiles. Rachel led a lesson, using pictures of symbols that she had created and an outline of her body, which she created on the chalkboard. Rachel began by showing the children her symbols and having them guess where on her body she would place the symbols. The following is a list of some of the symbols she used, along with an explanation for their placement as well as a discussion of the emotions linked with these symbols:
• A star, inside of which sat a graduation collar and books – I placed this symbol in my head because, as I explained to the children, I have always loved school and was very proud of all my accomplishments in school. Moreover, my last name means “star” in Spanish.
• Two bicycles – I placed a picture of each bicycle in each of my arms. They represented my nephews, whom I love very much, and who had just learned how to ride bikes. I put them in my arms because every time I see them I give them a big hug.
• Coconut trees, with extensive roots coming out of them – I placed these two trees over my legs, with the roots covering my feet. I discussed with the children the concepts of “roots,” asking the children where some of them were born and how much of their memory was tied to that birthplace. I told them I was born in the Philippines and raised in Hawaii, which was why I chose coconut trees to symbolize my roots, because they are abundant in both countries. I also told the children that I am proud of where I come from and this pride makes me feel secure in who I am. It makes me feel like I can stand tall, which was why the trees go over my legs and down to my feet.
After this lesson, the children went to work on designing their tiles. We had taken their body outlines and made reduced-size copies of them so they could practice several times until they came up with a version that pleased them. Once they were satisfied, they could then transfer their designs from paper to tile. But before we could do that, we had to prep the tiles….
Prepping the Tiles
Step 1: Sanding and Gessoing
We had ordered forty-eight 1’ X 1’ Styreen tiles. Before the children could paint on them, we had to sand them down until they were smooth. After determining that the surface was smooth enough, we applied gesso to the surface. The gesso provided a proper surface to which the paint would be able to adhere. All this was done by the UCLA students, as we did not want to have the children inhale styreen particles and felt that sanding might be a little much for them. We also had the UCLA students apply the gesso, so as to ensure a smooth surface upon which the children could paint.
Step 2: Gridding and Transferring Outlines
At this point, we were ready to transfer their body outlines onto the tiles. In order to do this, we created a 4 x 4 grid on both their body outlines and on the tiles.
We transferred the body outline onto the tile by working in sections, one cube at a time, using pencil. Again, we had the UCLA students do the body transfer, as we felt it was not age-appropriate for the children. We did, however, have a discussion with the children about how the transfer works, and gave them a demonstration. Depending on the age of your students, you can make an interesting math lesson out of this!
Step 3: Painting the Background and Inside of Bodies of the Tiles
Now it was time to paint the tiles! We prepared the children by having a mini “refresher” course on painting etiquette. Then we lined the tables and set them to work! They began with the turquoise background, which required 3 coats of paint. When that was set, they painted the inside with a creamy mustard color. Because of the time it took to dry, this took several days to complete. As the children waited for the paint to dry, they continued to work on their tile designs on paper. We should note that we did still experience some difficulty with children putting an excessive amount of paint onto their brushes and having paint drip in unwanted places on the tile. We also had to work with the children on painting in smooth strokes, as we noticed globs of paint in different areas. This was to be expected, given the children’s level of excitement.
Step 4: Transferring their Symbols into their Bodies
At this point, the children had gone through several drafts of their tile design and were ready to transfer their designs from paper to tile. The children did this themselves, with close supervision from the UCLA students. Before the children transferred each symbol, a UCLA helped the child pick which brush was most appropriate and made sure he or she had enough of the necessary colors on his/her palette. Each UCLA student stayed on hand, supervising a group of four children, as there was inevitably a child here or there who would get upset about “messing up,” and the UCLA student would help the child repair the damage.
Mural Production: Three Steps
1. The Canvas
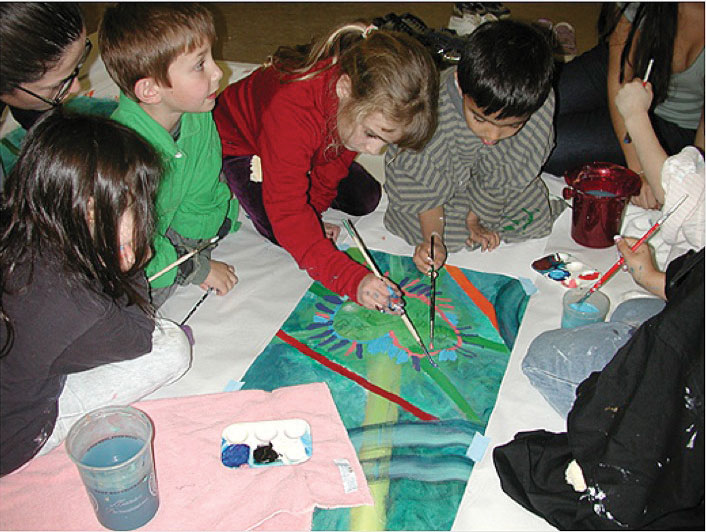
As the tiles were on their way to being finished, we felt it was time to start preparing the canvas for painting. Given our time constraints and because our canvas was rather large and we were working with children who were small in stature, we decided that the UCLA students would work on prepping the canvas and painting the background, while the children would work on designing the web. This would take care of some of our safety concerns, as we felt the children were too young to climb onto scaffolding.
Goals
• To help the children discover things that they had in common with one another.
• To foster healthy and kind relationships by having the children point out positive aspects of their peers.
• To show the children the many ways we are all connected with one another.
Prepping the Canvas
We applied two coats of gesso onto the canvas before painting. To paint the background, we went through different art books to find designs that we thought would be complimentary to our chosen color scheme. We found a pattern that we liked in a book on impressionism and tried to achieve an effect similar to what we saw in the picture, where blues shifted in intensity in different parts of the canvas, like water. To achieve that effect, Judy suggested we paint random strokes of bright orange onto the gessoed canvas. When that dried, we used our one color of blue, which was a mixture of several different blues and a hint of yellow, and painted over the entire canvas in small, circular motions. We achieved our desired effect, as the circular motions seemed to keep the paint distribution from being too uniform, thereby varying the levels of blue throughout the canvas. Moreover, where the blue hit the orange streaks, it deepened, creating a very rich effect.
2. Creating the Web: The Yarn Game
One of the main concepts behind The Woven Web was for children to identify what they had in common with each other, what ties them together as human beings. In order to find those commonalities, we played something we call The Yarn Game. This is how it worked:
We placed the canvas in the middle of the room, with all the tiles placed around the canvas. The children were asked to find their tiles and stand behind them. One child was then given a ball of yarn and asked to either say something they appreciated about someone else or to say something about themselves and see if someone else shared that characteristic. We began by having the UCLA students conduct a version of the yarn game amongst themselves. The game went something like this:
Rachel: “I was born in another country—the Philippines. Who else was born in another country or have parents who were born in another country?” (I tossed the yarn to Carolina, who raised her hand)
Carolina: “In my house, we speak Spanish. Does anyone else speak another language at home?” (Carolina tossed the yarn to Nobuko, who speaks Japanese at home)
Nobuko: “I was really proud of myself because I finished my application to graduate school. Who did something recently that they are proud of?” (She tossed the yarn to Vi, who raised her hand.)
Vi: “I am really proud of the fact that I was able to go to Vietnam because I learned so much. Has anyone else been able to travel somewhere far away?”
…and so forth.
The children enjoyed playing the yarn game, and while we discovered that the children
shared some interesting characteristics, we were also moved by how much they appreciated one another. It was striking to see how much goodness they saw in one another and how openly they expressed it. None of us left the game dry eyed.
As each child threw the yarn ball to another, we taped down the yarn to the canvas. In the end, we had yarn criss-crossing in various ways across the canvas. We studied the intersections and pulled them into bunches at different points along the canvas so that it created mini web clusters. In our final lesson plan, we would have the children placed into groups according to who was represented in each cluster and have them work together to find a symbol that represented all of them.
Creating the Spider
The spider in the center of our canvas was designed by one of our UCLA students, Nobuko Kikekawa.. After having read different spider stories and having talked extensively about spiders—how they live, what they eat, particulars of their anatomy, etc.—we asked each of the children to draw a spider for us. They came up with some fantastic designs.
As with all of our design lessons, we sat in a circle and shared our designs, explaining the details of our drawings and our thinking behind the details. Some of the UCLA students contributed their spider designs as well and we all agreed that Nobuko’s spider would make a lovely central piece.
3. Creating Unifying Symbols
After playing the yarn game, we pulled the yarn into ten clusters, forming mini webs within the bigger web. We decided to give the children another challenge: to try to work with a group in creating a symbol that would represent something they had in common with one another. For our final lesson plan, we wanted the children to work together in teams to create a unifying symbol that would represent each person in the group.
Goals
• To teach the children how to work together as a team, highlighting the art of compromise and consensus building.
• To manifest a group idea into visual expression.
Lesson Plan:
1) We put together ten groups of children and placed them with a UCLA mentor.
2) Together with the UCLA mentor, the children brainstormed about what they had in common with one another—what traits they shared, things they enjoyed doing together, things they liked, etc.
3) Once they arrived at a consensus regarding what their unifying symbol would be, they were asked to develop a strategy on how to create this symbol together.
Note: It was interesting to watch the design aspect of the negotiation process, because it proved to be even trickier than deciding the unifying symbol. The groups had different ways of addressing the issue. Several groups had each member design and paint one component of the symbol. Others continued the brainstorm in the design process and when someone in the group expressed an idea that they liked, then the group had that person come up with the design while others chimed in on color selections.
Outcome:
We were pleased at how easily this process worked with the children. In only one group did we struggle at finding a consensus, though we succeeded in the end. The following are pictures of some of the symbols the children created, along with their explanations for their image choice:
– A heart image, because they all loved and were loved.
– A picture of the earth, because they all were born on the same planet.
– Handball in the snow. This group of children could not decide whether or not they wanted their symbol to be handball (a favorite pastime) or a picture of their day in the snow. (Because some of the children that attended this school had never seen snow, they decided to have a ‘snow day.’ The school rented a snow machine and created a big hill of snow on campus so the kids could slide down it. It was one of the children’s favorite memories of the school year.)
Supplementary Lessons
• Journal entry of the experience.
• Write a story about the image you created, using the image as the central character or context.
• Write a short essay about the benefits and difficulties of working in a group, using this experience as an example.
Exhibiting Your Piece
Mural making is hard work. As such, you will want to pay tribute to your creation and to the students who made it. Have a ribbon cutting ceremony! Invite the parents!
Once our piece was completed, we had an exhibition of the work in the gallery at the Social and Public Art Resource Center. We guided the parents and other viewers through the process by showing samples of each phase of the project, along with didactics explaining the lesson and the intended goals for the lesson. The children and the UCLA students also spoke about the project and the lessons imparted to them through this work. It was a wonderful evening and a fitting end to such a remarkable project.
Curriculum Standards Alignment California Visual and Performing Arts Standards
In this document, we outline the standards that were met in this curriculum, focusing specifically on the Visual Arts Standards for both Kindergarten and First Grade, but note that many of the standards for the upper grades are also met. Remember that this curriculum can be extended beyond the lesson plans given and suggestions are offered to help you with some ideas on how to do that. These suggested extensions will align your lessons with even more standards for the upper grade levels. A copy of these standards can be obtained via internet at http://www.cde.ca.gov/standards/vpa/visualart/grade1.html
KINDERGARTEN
1.0 ARTISTIC PERCEPTION
Processing, analyzing, and responding to sensory information through the language and skills unique to the Visual Arts.
Students perceive and respond to works of art, objects in nature, events, and the environment. They also use the vocabulary of the visual arts to express their observations.
Develop Perceptual Skills and Visual Arts Vocabulary
1.1 Recognize and describe simple patterns found in the environment and works of art.
1.2 Name art materials (e.g. clay, paint, and crayons) introduced in lessons.
Analyze Art Elements and Principles of Design
1.3 Identify the elements of art (line, color, shape/form, texture, value, space) in the environment and in works of art, emphasizing line, color and shape/form.
2.0 CREATIVE EXPRESSION
Creating, performing, and participating in the Visual Arts
Students apply artistic processes and skills, using a variety of media to communicate meaning and intent in original works of art.
Skills, Processes, Materials and Tools
2.1 Use lines, shapes/forms, and colors to make patterns.
2.2 Demonstrate beginning skill in the use of tools and processes, such as the use of scissors, glue, and paper in creating a three-dimensional construction.
2.3 make a collage with cut or torn paper shapes/forms.
Communication and Expression Through Original Works of Art
2.4 Paint pictures expressing ideas about family and neighborhood.
2.5 Use lines in drawings and paintings to express feelings.
2.6 Use geometric shapes/forms (circle, triangle, square) in a work of art.
3.0 HISTORICAL AND CULTURAL CONTEXT
Understanding the Historical Contributions and Cultural Dimensions of the Visual Arts.
Students analyze the role and development of the visual arts in past and present cultures throughout the world, noting human diversity as it relates to the visual arts and artists.
Role and Development of the Visual Arts
3.1 Describe functional and non-utilitarian art seen in daily life; that is, works of art that are used versus those that are only viewed.
3.2 Identify and describe works of art that show people doing things together.
Diversity of the Visual Arts
3.3 Look at and discuss works of art from a variety of times and places.
4.0 AESTHETIC VALUING
Responding to, analyzing, and making judgments about works in the Visual Arts.
Students analyze, assess, and derive meaning from works of art, including their own, according to the elements of art, the principles of design, and aesthetic qualities.
Derive Meaning
4.1 Discuss their own works of art, using appropriate art vocabulary (e.g. color, shape/form, texture.)
4.2 Describe what is seen (including both literal and expressive content) in selected works of art.
Make Informed Judgments
4.3 Discuss how and why they made a specific work of art.
4.4 Give reasons why they like a particular work of art they made, using appropriate art vocabulary.
5.0 CONNECTIONS, RELATIONSHIPS, APPLICATIONS
Connecting and applying what is learned in the Visual Arts to other art forms and subject areas and to careers.
Students apply what they learned in the visual arts across subject areas. They develop competencies and creative skills in problem solving, communication, and management of time and resources that contribute to lifelong learning and career skills. They also learn about careers in and related to the visual arts.
Connections and Applications
5.1 Draw geometric shapes/forms and repeat them in dance/movement sequences.
5.2 Look at and draw something used every day (e.g. scissors, toothbrush, fork) and describe how the object is used.
Visual Literacy
5.3 Point out images (e.g. photographs, paintings, murals, ceramics, sculptures) and symbols found at home, in school, and in the community, including national and state symbols and icons.
Career and Career-Related Skills
5.4 Discuss various works of art (e.g. ceramics, painting, sculpture) that artists create and the media used.
GRADE ONE
NOTE: Because many of the standards repeat, we will only note new standards for this grade level that apply to the curriculum.
2.0 CREATIVE EXPRESSION
Skills, Processes, Materials, and Tools
2.1 Use texture in two-dimensional and three-dimensional works of art.
2.2 Mix secondary colors from primary colors and describe the process.
2.3 Demonstrate beginning skill in the manipulation and sue of sculptural materials (clay, paper, and papier maché) to create form and texture in works of art.
Communication and Expression Through Original Works of Art
2.4 Plan and use variation sin line, shape/form color, and texture to communicate ideas or feelings in works of art.
2.5 Create a representational sculpture based on people, animals, or buildings.
2.6 Draw or paint a still life, using secondary colors.
2.7 Use visual and actual texture in original works of art.
2.8 Create artwork based on observations of actual objects and everyday scenes.
4.0 AESTHETIC VALUING
Responding to, analyzing, and making judgments about works in the visual arts.
Students analyze, assess, and derive meaning from works of art, including their own, according to the elements of art, the principles of design, and aesthetic qualities.
Derive Meaning
4.1 Discuss works of art created in the classroom, focusing on selected elements of art (e.g. shape/form, texture, line, color).
4.2 Identify and describe various reasons for making art.
Make Informed Judgments
4.3 Describe how and why they made a selected work of art, focusing on the media and technique.
4.4 Select something they like about their work of art and something they would change.